

These might not qualify as your average "healthy" food, but my Brother and I decided on a whim to make these on New Years day and I HAD to add them to my blog. More so because I'm about the most disorganized person I know and I need to have the recipe at my fingertips and it's easy to find here.
So let me start off by saying, #1 - I am NOT a professional photographer and most of my pictures of the process kind of suck, (the above one being the best out of the bunch) but you will get the gist of it. If not, then I'm sorry, nothing else I can do LOL #2 - I am pooped out! Although the end result was fantastic, these do require a lot of time and work and I'm just plain tired now and ready for a nap, BUT, here I am sitting here at the computer making sure that you, the readers, are able to make these phenomenal tamales at your house.
These particular tamales took us from start to finish about 10 hours and we made 3 different kind, totaling 110 tamales. DON'T PANIC!! We didn't work the whole time, lol there is a lot of waiting time inbetween stages. We made traditional pork and beef and then experimented with some left over pork and made some with a green sauce. Your best bet, is to invite a bunch of friends over and have a Tamale Rolling party!! It's a great excuse to bust out the Margaritas or Corona, and the Chips and Salsa.
These particular tamales took us from start to finish about 10 hours and we made 3 different kind, totaling 110 tamales. DON'T PANIC!! We didn't work the whole time, lol there is a lot of waiting time inbetween stages. We made traditional pork and beef and then experimented with some left over pork and made some with a green sauce. Your best bet, is to invite a bunch of friends over and have a Tamale Rolling party!! It's a great excuse to bust out the Margaritas or Corona, and the Chips and Salsa.
To make the Tamale Meat - Your going to want to do this the night before because it has to cook for 10-15 hours


- 1 large beef or pork roast
- 4 -5 garlic cloves
- 2 tablespoons ground cumin
- 1 teaspoon lime juice
- 2 teaspoons all-purpose flour
- 1 teaspoon lime juice
- 2 medium onions
- ¼ bunch of celery
- 2 cubes beef bouillon
 1. Place all ingredients in slow cooker (except for flour, that's used later on) and fill with water till meat is completely submerged.
2. Set slow cooker on high heat for about 2 hours (until water begins to simmer)
3.. Continue to cook on low for an additional 10 – 15 hours (depending on how tender you would like the meat)

Now that your husks are taking a luxurious bath, It's time to shred the meat!! See how fancy schmancy I am?? Aluminum foil on a cookie sheet, I should be a Pro!! lol

Tamale Sauce
This is the backbone for your meat. This is what gives it the BOOYAH factor. This sauce is awesome and can be used with any meat. I'm sure it would be perfectly fine with some shredded chicken, even some fish tacos if your going vegetarian style (if your the type that eats fish)
Ingredients
- 15 large dried chilies (such as Anaheim, New Mexico, California, or pasilla)
- 4 -5 garlic cloves
- 2 teaspoons ground cumin
- 1 teaspoon salt
- 2 teaspoons all-purpose flour
- 2 teaspoons olive oil (or) 2 teaspoons melted shortening
Remove stems and seeds from dried chili peppers.


Place peppers in a single layer on a baking sheet.
Roast in 350°F oven for 2 to 5 minutes or until you smell a sweet roasted aroma, checking often to avoid burning. Don't they look pretty? They smell like heaven!!
Roast in 350°F oven for 2 to 5 minutes or until you smell a sweet roasted aroma, checking often to avoid burning. Don't they look pretty? They smell like heaven!!

 Remove from oven and soak in enough water to cover for about 30 minutes or until cool. (We used cold but I honestly don't know if hot or cold water makes a difference)
Put peppers and 2 1/2 cups of the soaking water into a blender (save the remaining soaking water). Add garlic, cumin and salt. Cover and blend until smooth.
Now here, you're going to make a rue. AGAIN....DON'T PANIC!l People say the word Rue, and they are like OMG, I have to make gravy??? And run.....well, this is easy peasy (but I made my bother do it cuz I am one of those people who run when it comes to making gravy) LOL
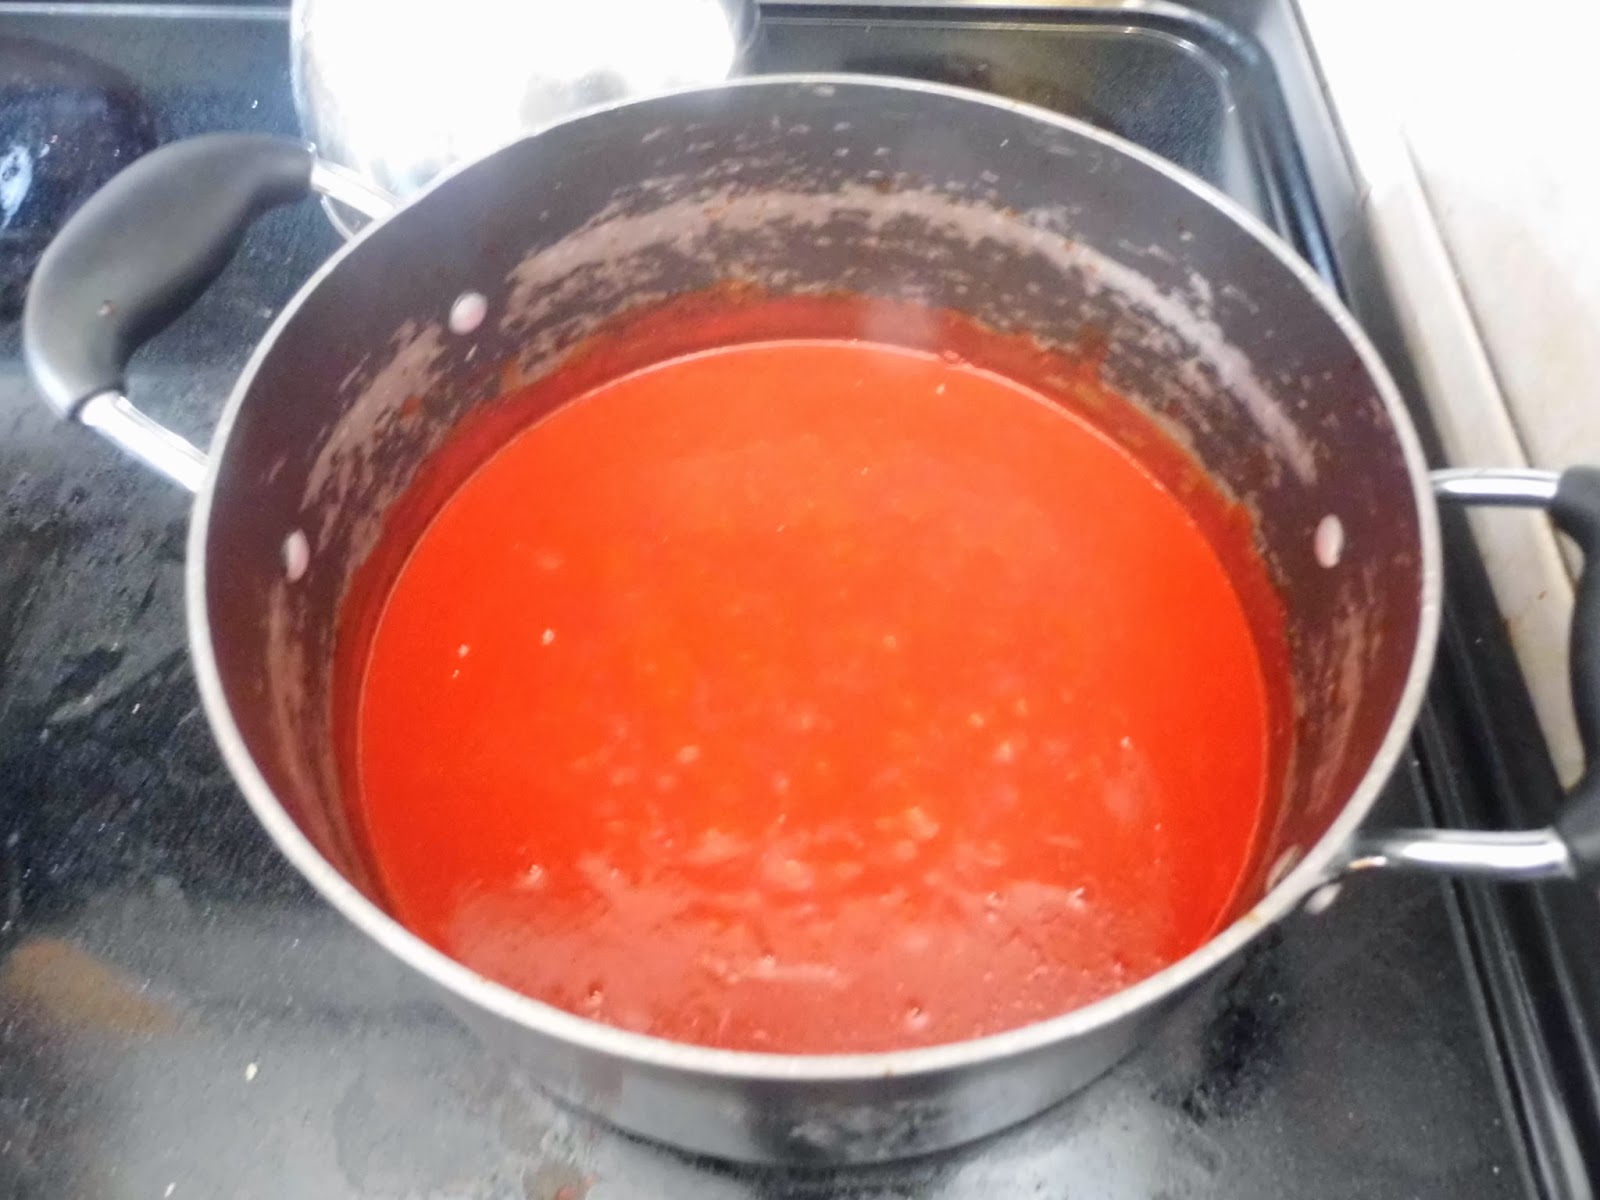
In a 2-quart sauce pan, stir flour into oil or melted shortening over med heat until browned. Carefully stir in blended chili mixture. Simmer uncovered for 5 to 10 minutes or until slightly thickened. (If sauce gets too thick, stir in up to 1 cup of the remaining soaking water from the peppers until you reach the desired thickness) It should look something like this (once again, NOT a photographer and the lighting was horrible)
By this time, your meat should be shredded and should be added to your super yummy sauce. Go ahead and dump it all in there. Simmer that for about an hour so that the sauce saturates the meat thoroughly, like I said, this sauce is the backbone of the tamale.
This is important!!!
GO GET A REFILL, GRAB A CHAIR AND GATHER YOUR ROLLING PARTY CUZ IT'S TIME TO ROLL YOUR TAMALES!
Start out by draining most of the water out of the husks. You don't want them too wet cuz the dough doesn't spread very well when they are really wet.
 OH YEAH! DUH! I almost forgot the most important part of the tamale, The Mesa or the "outside" around the meat inside the husk.
 We totally cheated and bought the already made dough since this was my first time making these. My brother talked to a few women who make tamales on a regular basis and they said that even they use this as you will be spending more money and way more time trying to make the dough from scratch...so....we listened! This is the brand that we used.

Did you happen to notice that that they are two different kinds??
Well, we didn't until we pulled them out of the fridge and got ready to make them so we decided to wing it and mix them together! And holy smokes, it was like mixing the thickest meatloaf EVER! lol One, the natural, didn't have any of the peppers in it, so it was just basically white. But the other one was red and had peppers (the kind that we just blended) and other spices added to it. Mixing the two together didn't cause any flavor loss either so we were happy with that.
So, back to the rolling at hand. This was our assembly line

 Start out with the corn husk, spread some of the dough fairly thin with the backside of a tablespoon. This will be to your liking depending on if you like a little or a lot of the mesa, but ONE of the containers makes about 50 and we put it on about medium thick cuz we likey that part!
Add the meat right in the center - not too much and not too little, because as the tamales steam, the mesa gets "puffier"


When you start to roll them, you want to make sure that the mesa touches on your first turn of the husk - I hope that makes sense because that is what "seals" your meat in.
On your second or third turn or roll (depending on how large the corn husk is) you want to fold over the "tail" like a burrito so that it keeps all your goodies in there.

VOI-LA!! The perfect rolled Tamale!!
 Once you have them all rolled and laid out on a fancy foil covered cookie sheet like we did, heat up a large pan with about an inch of water. We are going to do something like a double boil. (A pot in a pot with boiling water in it). In our case, we turned a colander over on its side and laid them in this way so that they steam up and down instead of lying down. Eventually you turn it right side up to put it in the pan of water but it was easier to fill this way. There is a purpose to this! If you lie them down and stack them on top of one another, the ones in the middle do not get done and you have a gooey mess on your hands once you open the husk..NOT GOOD
My brother learned this the hard way - hee hee hee - neener neener Brad!
If they are stacked up and down, they will get more steam and therefore, not have the ooey gooey mess.
Cover the pots with a towel and let them steam for about an hour on medium heat, just a small boil. If you have a lid that actually fits over both of them, by all means use that - but...we are ghetto fabulous and just used 2 kitchen towels so that the steam wouldn't escape. Make sure you check the water level periodically because it does evaporate quickly, probably every half hour or so and add more in the bottom pot if needed.
CONGRATULATIONS!! YOU JUST MADE HOME MADE TAMALES!!
Thank you for putting up with my exhausting long post but I really hope you enjoy these - they are fabulous and no one will ever know that they didn't come straight from a Mexican Restaurant!!
Head on over to my Facebook Page where you can catch more recipes!!
Came across this recipe on pinterest and they look soooo good. I'm going to try these!!
ReplyDeleteI may have missed it but how long do you steam them? I'm going to attempt to make them for Christmas Eve.
ReplyDeleteShe said about an hour on medium heat.
DeleteI may have missed it but how long do you steam them? I'm going to attempt to make them for Christmas Eve.
ReplyDeleteI am going to attempt these in a few weeks. But I have to say your instructions made my day. Thanks for the smile :)
ReplyDeleteSame. I enjoyed the read!!
DeleteI guess our masa didnt have anything adedd to it because it was extremely bland :/
ReplyDeleteMaking this with my son today.. he is 5 and this will be his first batch :) Thank you for your post :)
ReplyDeleteBoth sides of my family makes them and I never learned. I would like to attempt to and this really helps! By the way, it's masa not mesa. Mesa means table ;)
ReplyDeleteYou know tamales are done when they separate from corn husk not gooey they take quite a length of time.
ReplyDeleteI made these and they turned out very well. I loved them I made pork. I'm gonna make beef next time . Thanks for the recipe
ReplyDeleteHow many tamales does this recipe make?
ReplyDeleteI want to make these and freeze some of them. Do I steam them, let them cool and then can I freeze them?
ReplyDeleteFreeze uncooked, wrapped well. No need to defrost but adjust (+) steaming time.
Deletemaking them now!!!!!
ReplyDeleteAre these spicy?
ReplyDeleteMade some many years ago with my Mom and a friend of hers from work they were delicious, this recipe sounds great I WILL be making these, I'm one of these anal people especially about my kitchen, soooo I will be making them by myself, no problem, I love to cook and I love a challenge, this is right up my alley, will get back to you after I've made them and have had the family over for some homemade tamales, maybe next week when I will have a little more time to myself, while the other is not home oh my taste buds are going crazy right now, may not be able to wait, we'll see, but I do love tamales,lol thanks for the recipe,and the great directions, sounds like you two had fun making them, thanks again
ReplyDeleteThese are hands down the best tamales I have ever made. I love this recipe. Thanks so much for it.
ReplyDeleteCan you make the mesa ahead of time?
ReplyDeleteFYI: roux
ReplyDeleteYour jokes stink but your recipe is spot on. Thanks for all the tips. The photos are fine
ReplyDeleteVaping is an extraordinary method to kick the cigarette propensity, and is by and large idea of as a more advantageous option in contrast to smoking. It might spare you a decent arrangement of . Can you use electric smokers indoors?
ReplyDeleteYou can freeze them after cooking. When I lived in Mexico the Tamale lady would deliver me 3or4 dozen every week or so and we froze them in plastic bags the heavy duty freezer bags about 6 in each bag just enough for our favorite breakfast. Just take out of the freezer and wrap with wet paper towels lay them out on plate put in microwave start at 3 maybe 4 minutes depending on the watts on your microwave then check them if necessary go every 30 seconds till done.I never had a problem with them and when I can find someone making Tamales I buy and freeze them here in the states. Though I have moved in too a Food Saver for freezing
ReplyDelete